Splunk's Attack Range
Your Full Installation Guide

By JUSTIN PRESSLEY
Splunk's Attack Range
Splunk quite literally changed the information security landscape with the introduction of Attack Range, their rock star breach and attack simulation development platform. Essentially, Attack Range allows users to quickly and accurately emulate a production enterprise environment. Once this “lab” is created, they can perform simulated attacks to gather data that they can then apply to real-world threats.
When combined with a solid content development pipeline, Attack Range proves a major boon to any organization’s detection or info security team. With millions of people now working remotely all over the world, such an advancement could not have come at a better time.
Putting Attack Range to Use
It’s important to consider what aspects of your environment you want to generate detections for or monitor. After all, this will largely determine the actual architecture of the cyber range you create.
For instance, those users who want to focus on Windows endpoint-based logging will feel right at home with the default configurations. Alternatively, those who would rather implement Attack Range for web application testing / detection might find the default configurations are not quite up to the challenge.
While Attack Range can be modified to fit your specific needs, doing so can be a pretty laborious task. Fortunately, Splunk has included some native configurations that allow the platform to be much more scalable. These include:
- cloud_provider – Currently, the project supports Azure and AWS.
- windows_domain_controller – A boolean that specifies whether or not to build a domain controller into the range
- phantom_server – A boolean that specifies whether or not to build a phantom instance into the range
- windows_server – A boolean that specifies whether or not to build a windows server into the range.
- kali_machine – A boolean that specifies whether or not to build a Kali Linux machine into the range
- windows_client – A boolean that specifies whether or not to build a windows workstation into the range
Installing Attack Range on macOS
First things first, there are a few things to consider when installing Attack Range on the macOS.
- As smooth operation is essential to the platform’s effectiveness, you should be aware that the
python3 version packaged in macOS will encounter issues if you rely on it to build Attack Range. This is due to its implementation conflicting with several of the required libraries. - Since the OS leverages these libraries during normal operation, modifying them may interfere with some processes or even damage the system. A solution to this is to re-install python, which you can ¿
, and then run the “export PATH=/usr/local/bin:$PATH” command to add the binary to your path. - You’ll also note that the Xcode version shipped in macOS version 10.15.7 and later will encounter issues with some of the python libraries Attack Range requires. Fortunately, you can navigate here and download an earlier version of Xcode (ideally 11.7), which will allow you to solve the issue. Once you’ve done this, run the following command: sudo Xcode-select -s /Path/to/App/Xcode.app. Afterward, run the sudo xcodebuild-license command to accept the license. Just be sure to type “Agree” at the end of the document.
Before you setup Attack Range
You’ll need an account with your cloud provider to set up a cloud-based Attack Range. Though by using AWS as an example here, remember that Azure is also an option. After your account is active, you need to take a few other steps to ensure smooth implementation.
- Set up your account in AWS by navigating to the AWS management console and locating the IAM service listed there.
- From there, you will click on the User menu to bring up the user dashboard. Once there, find the “Add User” button and click it.
- Once you are in the “Add user” screen, you will be prompted to enter a name for the user account. Be sure to select the “Programmatic access” option as well.
- Next, you will need to select the various permissions for this new account. In this case, the permission you want to grant is “AmazonEC2FullAccess.”
- The final step in creating an account, you will be greeted with a screen showcasing your Access Key ID and Secret Access Key. Make sure to record these numbers, as you’ll need them later.
- Attack Range makes use of Ubuntu on the AWS platform, which can be found here.
- To finish up, you’ll need to add an SSH Key Pair for your region. You can do this by navigating to the EC2 Dashboard in AWS and selecting the “Key Pairs” option in the left-hand navigation bar. Once there, click the “Actions” dropdown and select “Import Key Pair.”
- Please note that the key pair file referenced here is the SSH public key you will create later in this article. Just be sure to note the name you give this key and the region you are in, as both of these will come up again.
Known as “Brew” for short, Homebrew is an open-source package management tool for macOS and Linux. In my humble opinion, it is worth its weight in gold. Not only does it streamline the often-complex installation of third-part packages, but it is very helpful when setting up technologies like Terraform and awscli.
The quickest way to install Brew is by using the following one-liner:
/bin/bash -c "$(curl -fsSL https://raw.githubusercontent.com/Homebrew/install/HEAD/install.sh)”
To interact with your cloud provider, you will need to leverage an SSH key. This will allow for secure communication between their systems and yours. As a best practice, you should always generate SSH keys using the SSH-keygen command on your mac. You can accomplish this using the following one liner.
ssh-keygen -b 2048 -t rsa -f /tmp/ -q -N “”
Be sure to pay attention to what you name it and where it is stored. The command creates SSH keys with no passphrase using the “”, which is necessary for smoothing out the programmatic interaction with your cloud provider’s environment
Installation Instructions
Once all of these prerequisites are met, you can start building our Attack Range environment. Luckily, the steps in this process will be fairly straightforward, providing you followed the instructions above. If you encounter any issues during the process, I recommend you revisit the earlier sections of this article to see if you missed anything.
1
You’ll start by creating a separate folder to house all of the files associated with this particular range build. While not strictly necessary, doing this will save you a lot of time when it comes to troubleshooting or creating multiple ranges. After completion you will move into that folder by leveraging the cd command.
					mkdir <project name>
cd <project name>
2
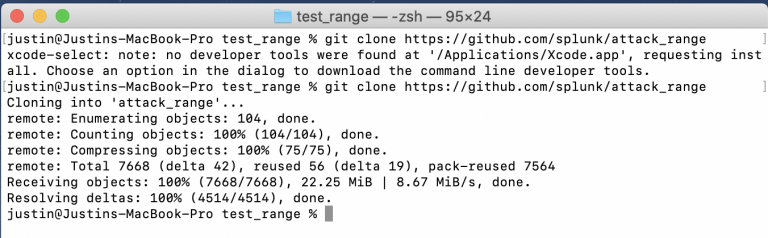
Now that you are in your project folder, you need to pull all of the Attack Range files from their Github page. After this, you can move them into the attack-range folder.
					git clone https://github.com/splunk/attack_range
cd attack_range
3
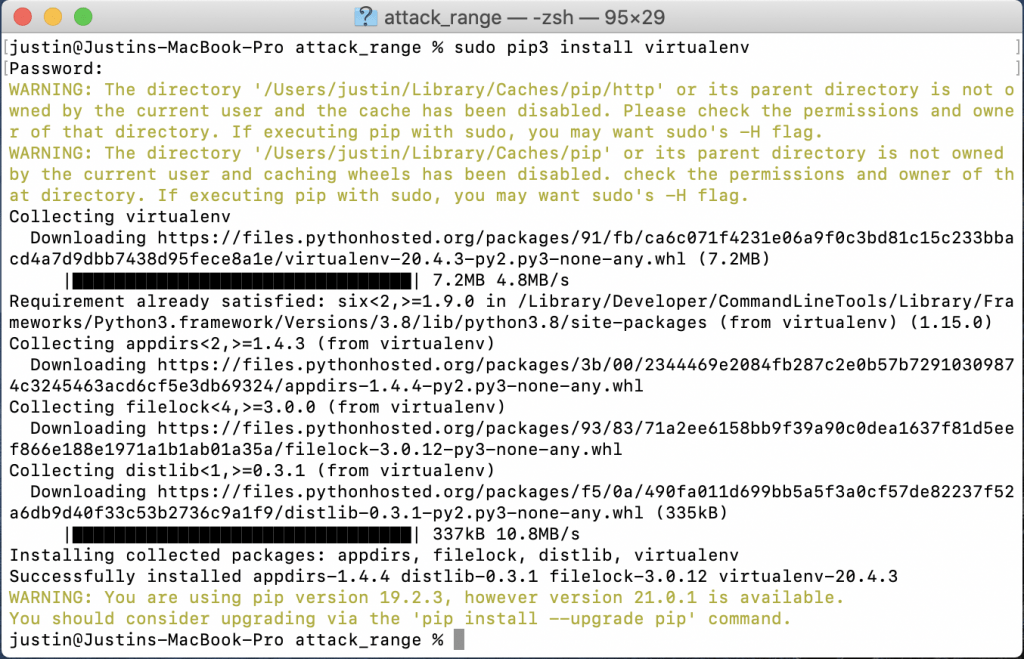
From here, you will need to use pip to install virtualenv. This is a python module used to compartmentalize python binaries and their dependencies. Once virtualenv is installed, you simply need to use it to create a python virtual environment and then turn it on.
Note: in order to turn off the virtual environment, you simply need to use the “deactivate” command instead.
The next step is to install the project’s dependencies.
					 pip3.9 install virtualenv
python3.9 -m virtualenv -p python3 venv
source venv/bin/activate
4
The next step is to install the project’s dependencies and awscli tools
					pip install -r requirements.txt
brew install awscli

5
Now you will need to configure some AWS items. First you will configure the CLI and then terraform. You’ll use the information you saved when setting up your AWS user account in the “Before You Setup Attack Range.” You will also need to configure the path and initialize.
AWS configure
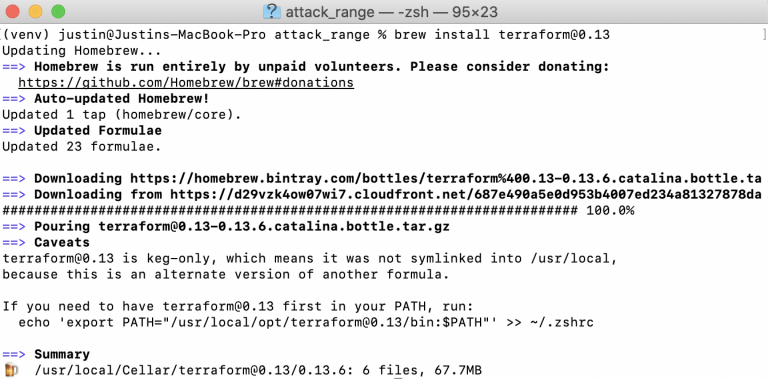
brew install terraform@0.13
export PATH=“/usr/local/opt/terraform@0.13/bin:$PATH"
cd terraform/aws && terraform init && cd ../..
6
After Terraform is installed and initialized, you can now configure the attack_range.conf files. You should configure at least the following:
- attack_range_password
- key_name
- ip_whitelist
- private_key_path
- region
cp attack_range.conf.template attack_range.conf && vim attack_range.conf
7
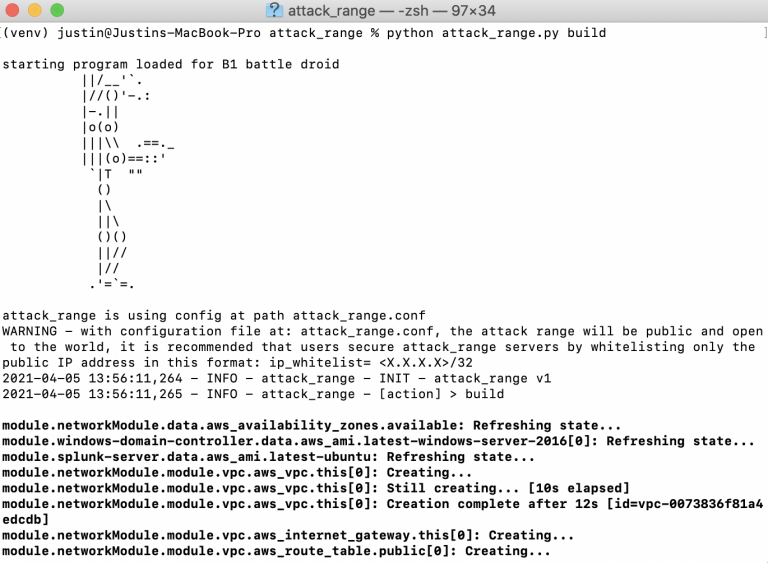
Now, before you run the build operation on Attack Range, we perform a test.
The build will take quite a while to complete, so try to be patient as the range is constructed. Remember, you can always destroy your range using “python attack_range.py destroy” and start/stop your range environment by using “python attack_range.py stop” and ”python attack_range.py resume,” respectively.
					AWS ec2 describe-instances
python attack_range.py build
Conclusion
Splunk’s Attack Range platform is just one of the many incredible tools available to modern threat detection teams. Not only does it empower us to create accurate and viable detections for any and all malicious activity, but it does so inside of an ever-evolving landscape. Of course, the real value in a platform such as this can only be realized when it is incorporated into a mature CI/CD pipeline. At Concanon, we specialize in taking our client’s cybersecurity to the next level, utilizing any and all technologies to keep their information and reputation safe.
Want to verify your technology investment is working?
Concanon provides Control Validation services to help security leadership understand and communicate their investment in to risk mitigation. We pride ourselves on being a data solutions company for data based decision makers. Contact us today for a quick call to see how we can help you solve your issues with Control Validations.
Concanon's Author
Justin Pressley is a Cybersecurity Consultant for Concanon LLC, building, developing, and leading security tooling. Justin has 10 years of experience in IT and has built cyber ranges and content for some of the largest firms in the U.S. His programming background provides a deeper level of insight in to the required data needed for proper detection of the newest cybersecurity threats.